背景
在实际项目中,遇到了需要唤起手机摄像头拍照的需求,最开始是通过<input type="file" hidden accept="image/*" capture="camera" />的方式,可以直接唤起手机相机,但是用户拍照的方向各式各样,导致后续业务处理时,没有达到预期的效果。
基于此,产品同学期望能在用户拍照时给用户一个引导框(也就是平时我们在用第三方证件拍照时的取景框效果)。经过讨论,给出了两种解决方案,一种是通过我们自研,先尝试看一下效果,第二种是使用第三方的 SDK,仅使用他们的拍照功能。
本文档仅涉及第一种,即通过我们自研的方式,实现 H5 拍照选景框的效果。
技术方案
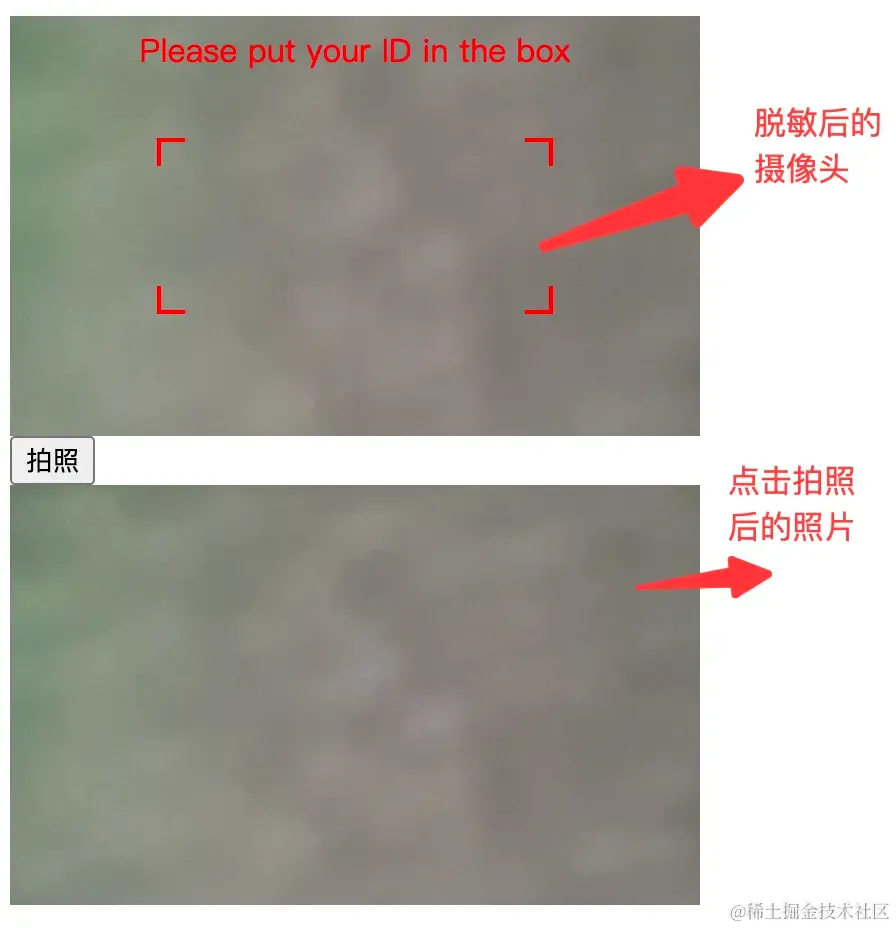
最终效果示例

核心实现
1、核心实现:利用 navigator.mediaDevices.getUserMedia 打开摄像头,将视频流放入 video 标签的 src 中,再通过 canvas.drawImage 的方法,以 video 对象为画布源,绘制最终拍照的图片。
2、代码示例:
1)HTML 示例
1<div id="cameraContainer">
2 <video id="cameraView" width="345" height="210" autoplay></video>
3 <div class="frame-container">
4 <div class="mask"></div>
5 <div id="frame">
6 <div class="corner topLeft"></div>
7 <div class="corner topRight"></div>
8 <div class="corner bottomLeft"></div>
9 <div class="corner bottomRight"></div>
10 </div>
11 <div style="margin-top: 6px; text-align: center; color: red">
12 Please put your ID in the box
13 </div>
14 </div>
15 </div>
16 <button id="captureButton">拍照</button>
17 <canvas id="canvas" style="display: none"></canvas>
18 <img id="photo" alt="Captured Photo" />
2)JS 示例
1 const video = document.getElementById("cameraView");
2 const frame = document.getElementById("frame");
3 const captureButton = document.getElementById("captureButton");
4 const canvas = document.getElementById("canvas");
5 const photo = document.getElementById("photo");
6
7
8 navigator.mediaDevices
9 .getUserMedia({ video: true, audio: false })
10 .then((stream) => {
11 video.srcObject = stream;
12 })
13 .catch((error) => {
14 console.error("获取摄像头权限失败:", error);
15 });
16
17 captureButton.addEventListener("click", () => {
18 const context = canvas.getContext("2d");
19
20
21 console.log(video.videoWidth);
22 canvas.width = video.videoWidth;
23 canvas.height = video.videoHeight;
24
25
26 context.drawImage(video, 0, 0);
27
28
29 photo.src = canvas.toDataURL();
30 photo.style.display = "block";
31 });
32
可运行 Demo
1、在 VS Code IDE 中,创建一个 HTML 文件,将下面的代码复制即可。
2、启动 VS Code 的 Live Server 插件(如果没有,可以安装,如果有其他方案也可),然后通过 127.0.0.1 或 localhost 的方式访问,对应的端口和路径,请按照你的 HTML 文件路径来即可。
3、注意:不要用局域网内的 IP 访问,否则会无法唤起摄像头,后面注意事项中会说明原因和解决方案。
1<!DOCTYPE html>
2<html>
3 <meta
4 name="viewport"
5 content="width=device-width,initial-scale=1,minimum-scale=1,maximum-scale=1,user-scalable=no,viewport-fit=cover"
6 />
7 <head>
8 <style>
9 #cameraContainer {
10 position: relative;
11 width: 345px;
12 height: 210px;
13 overflow: hidden;
14 }
15
16 #cameraView {
17 object-fit: cover;
18 }
19 .frame-container {
20 position: absolute;
21 top: 0;
22 left: 0;
23 width: 100%;
24 height: 100%;
25 }
26
27 .mask {
28 position: absolute;
29 width: 100%;
30 height: 100%;
31 }
32 #frame {
33 position: absolute;
34 top: 50%;
35 left: 50%;
36 transform: translate(-50%, -50%);
37 width: 200px;
38 height: 90px;
39 z-index: 10;
40 background-color: transparent;
41 }
42
43 .corner {
44 position: absolute;
45 border-color: red;
46 border-style: solid;
47 padding: 6px;
48 }
49
50 .topLeft {
51 top: 1px;
52 left: 1px;
53 border-width: 2px 0 0 2px;
54 }
55
56 .topRight {
57 top: 1px;
58 right: 1px;
59 border-width: 2px 2px 0 0;
60 }
61
62 .bottomLeft {
63 bottom: 1px;
64 left: 1px;
65 border-width: 0 0 2px 2px;
66 }
67
68 .bottomRight {
69 bottom: 1px;
70 right: 1px;
71 border-width: 0 2px 2px 0;
72 }
73
74 #photo {
75 display: none;
76 width: 345px;
77 height: 210px;
78 }
79 </style>
80 </head>
81 <body>
82 <div id="cameraContainer">
83 <video id="cameraView" width="345" height="210" autoplay></video>
84 <div class="frame-container">
85 <div class="mask"></div>
86 <div id="frame">
87 <div class="corner topLeft"></div>
88 <div class="corner topRight"></div>
89 <div class="corner bottomLeft"></div>
90 <div class="corner bottomRight"></div>
91 </div>
92 <div style="margin-top: 6px; text-align: center; color: red">
93 Please put your ID in the box
94 </div>
95 </div>
96 </div>
97 <button id="captureButton">拍照</button>
98 <canvas id="canvas" style="display: none"></canvas>
99 <img id="photo" alt="Captured Photo" />
100
101 <script>
102 const video = document.getElementById("cameraView");
103 const frame = document.getElementById("frame");
104 const captureButton = document.getElementById("captureButton");
105 const canvas = document.getElementById("canvas");
106 const photo = document.getElementById("photo");
107
108
109 navigator.mediaDevices
110 .getUserMedia({ video: true, audio: false })
111 .then((stream) => {
112 video.srcObject = stream;
113 })
114 .catch((error) => {
115 console.error("获取摄像头权限失败:", error);
116 });
117
118
119 captureButton.addEventListener("click", () => {
120 const context = canvas.getContext("2d");
121
122
123 console.log(video.videoWidth);
124 canvas.width = video.videoWidth;
125 canvas.height = video.videoHeight;
126
127 context.drawImage(video, 0, 0);
128
129
130 photo.src = canvas.toDataURL();
131 photo.style.display = "block";
132 });
133 </script>
134 </body>
135</html>
注意事项
1、在实际项目中,需要注意做好容错,可以参考 MDN 中的容错代码,如果无法唤起手机摄像头(用户拒绝、浏览器不支持等),则需要根据实际情况,考虑兼容方案(给出提示、直接唤起原生相机等)
兼容代码如下(developer.mozilla.org/zh-CN/docs/…
1
2if (navigator.mediaDevices === undefined) {
3 navigator.mediaDevices = {};
4}
5
6
7
8if (navigator.mediaDevices.getUserMedia === undefined) {
9 navigator.mediaDevices.getUserMedia = function (constraints) {
10
11 var getUserMedia =
12 navigator.webkitGetUserMedia || navigator.mozGetUserMedia;
13
14
15 if (!getUserMedia) {
16 return Promise.reject(
17 new Error("getUserMedia is not implemented in this browser"),
18 );
19 }
20
21
22 return new Promise(function (resolve, reject) {
23 getUserMedia.call(navigator, constraints, resolve, reject);
24 });
25 };
26}
27
28navigator.mediaDevices
29 .getUserMedia({ audio: true, video: true })
30 .then(function (stream) {
31 var video = document.querySelector("video");
32
33 if ("srcObject" in video) {
34 video.srcObject = stream;
35 } else {
36
37 video.src = window.URL.createObjectURL(stream);
38 }
39 video.onloadedmetadata = function (e) {
40 video.play();
41 };
42 })
43 .catch(function (err) {
44 console.log(err.name + ": " + err.message);
45 });
2、当业务逻辑获取了 canvas 绘制的图片后,出于性能以及交互体验的考虑,应该关闭 video 播放、以及摄像头,可以参考如下代码:
1
2
3video.stop()
4
5
6
7 stream?.getTracks()?.forEach(function(track) {
8 track.stop()
9 })
3、本地跑 Demo 时,可以通过 localhost 或 127.0.0.1 的域名方式访问,此时是可以唤起摄像头,但如果用局域网的 IP 则不行,这是因为浏览器的安全限制,必须使用 https 才可以。此时有两种解决方案(仅应用于本地调试)
1)在将 Demo 相关的逻辑放入实际项目中时,启动项目时,如果也支持 localhost / 127.0.0.1 访问,则没有问题
2)如果本地能够支持 https 访问,则也可以唤起摄像头
3)如果上述均不可,则可以设置 chrome 浏览器的安全策略,将对应的域名或 IP 地址,打开为白名单,具体设置方式,请参考 juejin.cn/post/699030…
4、请务必保证线上业务是 https 协议,否则无法正常打开摄像头
风险点及待办
风险点
1、Demo 仅在电脑上尝试,不保证手机的兼容性问题及效果(正式上线前需要QA和产品做相关的兼容测试)
2、因为使用了 video 标签,蒙层也是在 video 标签上盖的,这里可能会涉及到 video 标签的兼容性问题,就是在不同的手机浏览器上,video 标签的优先级可能会很高,导致蒙层或遮罩无法盖住 video 标签(国产手机浏览器为重灾区)
待办
1、针对 Canvas 的取景框遮罩效果,暂未实现,后续如果有要求,可以考虑用图片替换,即让 UI 同学直接出一个镂空的取景框图片,直接替换对应元素即可
2、针对 Canvas 仅绘制取景框内容的功能未实现,这里涉及到如何调整 drawImage 相关的参数,以及裁切绘制后的图片是否可以被业务方所识别的问题,如果参数调整的不合适,会出现图片变形,模糊的情况
参考文档
案例参考:
2、www.cnblogs.com/yuzhihui/p/…
MDN API 参考:
1、CanvasRenderingContext2D.drawImage():developer.mozilla.org/zh-CN/docs/…
2、MediaDevices.getUserMedia():developer.mozilla.org/zh-CN/docs/…
其他:
1、如何让Chrome浏览器允许http网站打开摄像头和麦克风:juejin.cn/post/699030…
浏览知识共享许可协议
本作品采用知识共享署名-相同方式共享 4.0 国际许可协议进行许可。