lexical是一款facebook基于JavaScript开发的网页端文本编辑框架,具备高拓展性架构,以高可靠性、易用性以及性能表现为核心设计思想。本身不与任何框架绑定,可独立于React、Vue使用(不过由于facebook与React的亲和性,lexical有React版)。使用者可在其基础上建立属于自己的独一无二的文本编辑器
目前在Meta内部,每天lexical通过Facebook、Workplace、Messenger、WhatsApp、Instagram等产品服务千百万用户,稳定性及可靠性值得信赖
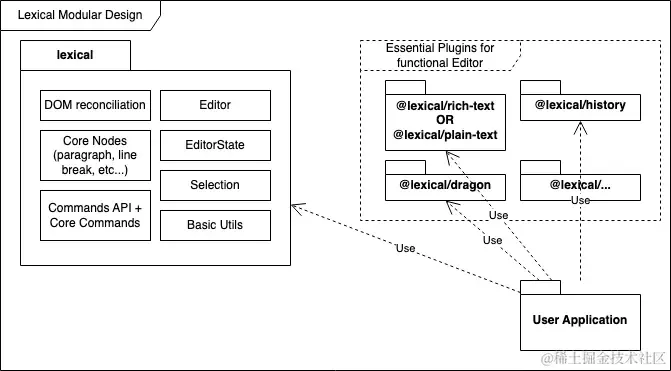
lexical的核心包(上图左侧部分)只有22kb,其余能力以plugin形式提供。框架支持延迟加载,plugin可以在用户真正操作编辑器的时候再加载,这样能获得比较好的性能表现。
能力
如果直接用浏览器的原生接口实现文本编辑器,那将是件比较复杂的工作。lexical提供了一条更快捷的途径,让开发者根据不同需求开发不同类型的文本编辑器,下面是几个简单的场景:
- 纯文本编辑器,但又比单纯的
<textarea>更复杂,比如有@能力,自定义表情包,链接以及话题标签 - 富文本编辑器,用于博客、社交、聊天应用的内容编辑
- 用于
CMS系统的的所见即所得编辑器
目前lexical仅提供web版,但开发团队后期会提供native版
核心概念

这是一张lexical架构图,涉及到许多核心概念及其之间的关系,例如state、transform、listener、plugin等,下面我们将对这些概念做简单介绍
Editor实例
Editor实例是连接一切的核心,是我们使用lexical的最核心对象。我们将可被编辑(contenteditable)的DOM元素与编辑器实例绑定,并且在实例上绑定事件监听和指令。更重要的是,需要通过实例来更新EditorState,Editor实例用createEditor()函数来创建
主题
lexical支持通过自定义主题的方式来实现样式定制,可以给每种DOM设置自己的className,然后通过css文件来定义样式。需要注意的是,lexical没有不提供默认的样式,如果没有设置对应的className,那么其dom元素不会有任何的class,也就不会有任何的样式。有时候一些功能需要js代码与css样式配合使用,例如斜体、删除线等
配置主题:
1import {createEditor} from 'lexical';
2
3const editor = createEditor({
4 namespace: 'MyEditor',
5 theme: {
6 ltr: 'ltr',
7 rtl: 'rtl',
8 paragraph: 'editor-paragraph'
9 }
10});
在css中这样设置:
1.ltr {
2 text-align: left;
3}
4
5.rtl {
6 text-align: right;
7}
8
9.editor-placeholder {
10 color: #999;
11 overflow: hidden;
12 position: absolute;
13 top: 15px;
14 left: 15px;
15 user-select: none;
16 pointer-events: none;
17}
18
19.editor-paragraph {
20 margin: 0 0 15px 0;
21 position: relative;
22}
许多核心节点都可以配置,这是一个更复杂的主题:
1const exampleTheme = {
2 ltr: 'ltr',
3 rtl: 'rtl',
4 paragraph: 'editor-paragraph',
5 quote: 'editor-quote',
6 heading: {
7 h1: 'editor-heading-h1',
8 h2: 'editor-heading-h2',
9 h3: 'editor-heading-h3',
10 h4: 'editor-heading-h4',
11 h5: 'editor-heading-h5',
12 h6: 'editor-heading-h6'
13 },
14 list: {
15 nested: {
16 listitem: 'editor-nested-listitem'
17 },
18 ol: 'editor-list-ol',
19 ul: 'editor-list-ul',
20 listitem: 'editor-listItem',
21 listitemChecked: 'editor-listItemChecked',
22 listitemUnchecked: 'editor-listItemUnchecked'
23 },
24 hashtag: 'editor-hashtag',
25 image: 'editor-image',
26 link: 'editor-link',
27 text: {
28 bold: 'editor-textBold',
29 code: 'editor-textCode',
30 italic: 'editor-textItalic',
31 strikethrough: 'editor-textStrikethrough',
32 subscript: 'editor-textSubscript',
33 superscript: 'editor-textSuperscript',
34 underline: 'editor-textUnderline',
35 underlineStrikethrough: 'editor-textUnderlineStrikethrough'
36 },
37 code: 'editor-code',
38 codeHighlight: {
39 atrule: 'editor-tokenAttr',
40 attr: 'editor-tokenAttr',
41 boolean: 'editor-tokenProperty',
42 builtin: 'editor-tokenSelector',
43 cdata: 'editor-tokenComment',
44 char: 'editor-tokenSelector',
45 class: 'editor-tokenFunction',
46 'class-name': 'editor-tokenFunction',
47 comment: 'editor-tokenComment',
48 constant: 'editor-tokenProperty',
49 deleted: 'editor-tokenProperty',
50 doctype: 'editor-tokenComment',
51 entity: 'editor-tokenOperator',
52 function: 'editor-tokenFunction',
53 important: 'editor-tokenVariable',
54 inserted: 'editor-tokenSelector',
55 keyword: 'editor-tokenAttr',
56 namespace: 'editor-tokenVariable',
57 number: 'editor-tokenProperty',
58 operator: 'editor-tokenOperator',
59 prolog: 'editor-tokenComment',
60 property: 'editor-tokenProperty',
61 punctuation: 'editor-tokenPunctuation',
62 regex: 'editor-tokenVariable',
63 selector: 'editor-tokenSelector',
64 string: 'editor-tokenSelector',
65 symbol: 'editor-tokenProperty',
66 tag: 'editor-tokenProperty',
67 url: 'editor-tokenOperator',
68 variable: 'editor-tokenVariable'
69 }
70};
Editor States
页面DOM内容的底层数据模型用Editor States表示,Editor States由两部分组成:
- 节点树
Selection对象
Editor States一旦被创建就不能直接修改,只能通过editor.update(() => {...})函数来更新,我们可以通过editor.getEditorState().read(() => {...})函数获取当前的Editor States。
想要深度了解
update原理,可以阅读这篇文章《Lexical state updates—— A deep dive into how Lexical updates its state》。传递给
update和read的函数必须是同步函数,在这里能获取到完整Editor States的地方。获取方式是用过带$前缀的函数,如$getRoot、$createTextNode等,这些$函数只能在update和read函数内部使用,否则会报运行时错误
update函数里的操作默认情况下是异步的,这就导致执行完不能直接获取到最新的Editor States,这在有些场景下是个问题,例如:
1editor.update(() => {
2
3});
4
5saveToDatabase(editor.getEditorState().toJSON());
原本的目的是操作完Editor States后将其存储到数据库里,但第5行的获取Editor States会先于数据更新执行,导致getEditorState获取到的是旧数据,解决这个问题需要设置discrete:
1editor.update(() => {
2 // manipulate the state...
3+ }, {discrete: true});
4
5saveToDatabase(editor.getEditorState().toJSON());
Editor States本身是JSON格式,可以通过editor.parseEditorState()来解析并通过editor.setEditorState()返回给编辑器
1const editorState = editor.parseEditorState(editorStateJSONString);
2editor.setEditorState(editorState);
Editor States可以被克隆(支持自定义selection),常见的场景是设定编辑器的内容,同时不设置任何的selection,例如:
1
2editor.setEditorState(editorState.clone(null));
如果想知道Editor States何时发生变化,可以利用事件监听来实现:
1editor.registerUpdateListener(({ editorState }) => {
2
3
4
5 editorState.read(() => {
6
7
8 });
9});
10
之所以采用Editor States,其中一个原因是html在处理富文本时过于灵活(其实这也是我们采用lexical而不是直接用浏览器原生ContentEditable编辑模式的原因,关于ContentEditable的痛点,可见《Why ContentEditable is Terrible》),比如下面几行的渲染效果是一样的(在ContentEditable模式下浏览器经常会插入无用的垃圾标签):
1<i><b>Lexical</b></i>
2<i><b>Lex<b><b>ical</b></i>
3<b><i>Lexical</i></b>
在ContentEditable编辑模式下,即便是换行这种操作也会有不同的结果:
1<p>Lex<br/>ical</p>
2<p>Lex</p></p>ical</p>
尽管我们有办法将其转换成一种“标准”格式,但这涉及到DOM操作以及额外的渲染,为了克服这种问题,我们采用了“虚拟树”(Editor States)的概念,将内容结构与内容格式进行了解耦,比如这个例子:
1<p>
2 Why did the JavaScript developer go to the bar?
3 <b>Because he couldn't handle his <i>Promise</i>s</b>
4</p>
其html结构如下:
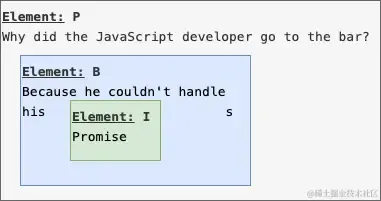
在这个例子里,因为内容格式的需要,其html结构不得不按照一种嵌套的方式来组织。作为对比,lexical会将信息映射为Editor States:

通过调用调用editor.getEditorState()函数可以获取当前最新的Editor States,在update函数里我们可以认为Editor States是可以被修改的,而在update之后,Editor States是不可变的,可以视为一份“快照”。
DOM渲染
lexical会将不同版本的Editor States作对比,在渲染内容时只对不同的地方做处理,这类似虚拟树,可以提供能好的性能
事件监听、节点转换、指令
除了触发updates,我们主要会用到事件监听、节点转换、指令和lexical打交道。这些都要通过editor实例,并且其接口统一带有register前缀。这些register函数会返回一个解绑函数,例如下面这段代码展示了如何监听update事件并解绑:
1const unregisterListener = editor.registerUpdateListener(({editorState}) => {
2
3 console.log(editorState);
4});
5
6
7unregisterListener();
在lexical中,指令是可以连接一切的通信系统,我们通过createCommand()函数创建自定义指令标签,用editor.registerCommand(handler, priority)函数注册指令,用editor.dispatchCommand(command, payload)函数触发指令。lexical会在内部对按键或其它信号做处理,其传递类似浏览器中的事件传递。
Node
Node作为EditorState的一部分,是整个lexical中的关键概念,其对应了底层数据模型。最底层的Node是LexicalNode,以此为基础又派生出了5个Node:
RootNodeLineBreakNodeElementNodeTextNodeDecoratorNode
其中lexical开发包暴露给开发者的是以下3个Node:
ElementNodeTextNodeDecoratorNode
下面我们对这几个Node做下介绍
节点类型
RootNode
在EditorState中仅有一个RootNode,是节点树最顶端的节点,其代表contenteditable元素自身。RootNode没有父元素以及兄弟元素。为了避免selection问题,lexical严禁直接向RootNode插入文本节点
LineBreakNode
在lexical中永远不用\n,取而代之的是LineBreakNode,这样可以抹平浏览器及操作系统之间的差异
ElementNode
通常作为其他节点的父元素出现,如ParagraphNode、HeadingNode、LinkNode
TextNode
作为整个节点树最末端的叶子节点,有几个文本特有的属性:
format:bold、italic、underline、strikethrough、code、subscript、superscriptmode:token:不可变节点,不能修改其内容和一次性全部删除segmented:可以被一次性全部删除
style:用于内联css
DecoratorNode
用于在编辑器中插入任意视图(组件)的包装器节点。
节点属性
支持给节点添加自定义属性,但必须是可以JSON序列化的,对于函数、Symbol、Map、Set这类数据不能作为属性。lexical里习惯将属性名称以双下划线__作为前缀,表示其私有及不可直接访问性质。
如果你希望添加一个可以被更改和访问的属性,需要创建get*()、set*()方法,在这两个方法内还需要规范使用内部函数getWritable()、getLatest()以确保lexical内部系统数据的一致性。除此之外,每一个节点都需要有static getType()方法以及static clone()方法,前者在重建节点(复制粘贴)时会用到,后者在创建EditorState快照时会用到,这是一个示例:
1class MyCustomNode extends SomeOtherNode {
2 __foo: string;
3 static getType(): string {
4 return 'custom-node';
5 }
6 static clone(node: MyCustomNode): MyCustomNode {
7 return new MyCustomNode(node.__foo, node.__key);
8 }
9 constructor(foo: string, key?: NodeKey) {
10 super(key);
11 this.__foo = foo;
12 }
13 setFoo(foo: string) {
14
15
16
17 const self = this.getWritable();
18 self.__foo = foo;
19 }
20 getFoo(): string {
21
22
23 const self = this.getLatest();
24 return self.__foo;
25 }
26}
自定义节点
lexical提供了基于ElementNode、TextNode、DecoratorNode进行自定义节点的能力
lexical内部的RootNode和ParagraphNode就是基于ElementNode创建的
ElementNode
下面是一个拓展ElementNode的示例:
1import { ElementNode, LexicalNode } from 'lexical';
2
3export class CustomParagraph extends ElementNode {
4 static getType(): string {
5 return 'custom-paragraph';
6 }
7 static clone(node: CustomParagraph): CustomParagraph {
8 return new CustomParagraph(node.__key);
9 }
10 createDOM(): HTMLElement {
11
12 const dom = document.createElement('p');
13 return dom;
14 }
15 updateDOM(prevNode: CustomParagraph, dom: HTMLElement): boolean {
16
17
18 return false;
19 }
20}
通常创建自定义节点的开发人员还需要提供一些以$开头的工具函数,以便使用者可以方便的创建、校验这些自定义节点,例如:
1export function $createCustomParagraphNode(): CustomParagraph {
2 return new CustomParagraph();
3}
4
5export function $isCustomParagraphNode(node: LexicalNode | null | undefined): node is CustomParagraph {
6 return node instanceof CustomParagraph;
7}
TextNode
1export class ColoredNode extends TextNode {
2 __color: string;
3 constructor(text: string, color: string, key?: NodeKey): void {
4 super(text, key);
5 this.__color = color;
6 }
7 static getType(): string {
8 return 'colored';
9 }
10 static clone(node: ColoredNode): ColoredNode {
11 return new ColoredNode(node.__text, node.__color, node.__key);
12 }
13 createDOM(config: EditorConfig): HTMLElement {
14 const element = super.createDOM(config);
15 element.style.color = this.__color;
16 return element;
17 }
18 updateDOM(
19 prevNode: ColoredNode,
20 dom: HTMLElement,
21 config: EditorConfig,
22 ): boolean {
23 const isUpdated = super.updateDOM(prevNode, dom, config);
24 if (prevNode.__color !== this.__color) {
25 dom.style.color = this.__color;
26 }
27 return isUpdated;
28 }
29}
30export function $createColoredNode(text: string, color: string): ColoredNode {
31 return new ColoredNode(text, color);
32}
33export function $isColoredNode(node: LexicalNode | null | undefined): node is ColoredNode {
34 return node instanceof ColoredNode;
35}
DecoratorNode
1export class VideoNode extends DecoratorNode<ReactNode> {
2 __id: string;
3 static getType(): string {
4 return 'video';
5 }
6 static clone(node: VideoNode): VideoNode {
7 return new VideoNode(node.__id, node.__key);
8 }
9 constructor(id: string, key?: NodeKey) {
10 super(key);
11 this.__id = id;
12 }
13 createDOM(): HTMLElement {
14 return document.createElement('div');
15 }
16 updateDOM(): false {
17 return false;
18 }
19 decorate(): ReactNode {
20 return <VideoPlayer videoID={this.__id} />;
21 }
22}
23export function $createVideoNode(id: string): VideoNode {
24 return new VideoNode(id);
25}
26export function $isVideoNode(
27 node: LexicalNode | null | undefined,
28): node is VideoNode {
29 return node instanceof VideoNode;
30}
节点覆盖(Node Overrides)
lexical开发包提供了ParagraphNode、HeadingNode、QuoteNode、List等内置节点,但如果你想自定义一个ParagraphNode并替换掉内置的节点,那该如何实现呢?首先我们以ParagraphNode为基础创建出一个自定义节点class。但如何告知lexical采用自己的自定义节点呢?这时节点覆盖(Node Overrides)就能发挥作用了,该功能支持你将节点做替换:
1const editorConfig = {
2 ...
3 nodes = [
4
5 CustomParagraphNode,
6 {
7 replace: ParagraphNode,
8 with: (node: ParagraphNode) => {
9 return new CustomParagraphNode();
10 }
11 }
12 ]
13}
这里有一个完整的开发示例
节点转换(Node Transforms)
节点转换是最有效率的修改EditorState的机制。以场景为例,如果用户输入的单词是congrats,那么就将这个单词的颜色设为蓝色,此时我们就可以通过节点转换来实现
节点转换的语法是:
1editor.registerNodeTransform<T: LexicalNode>(Class<T>, T): () => void
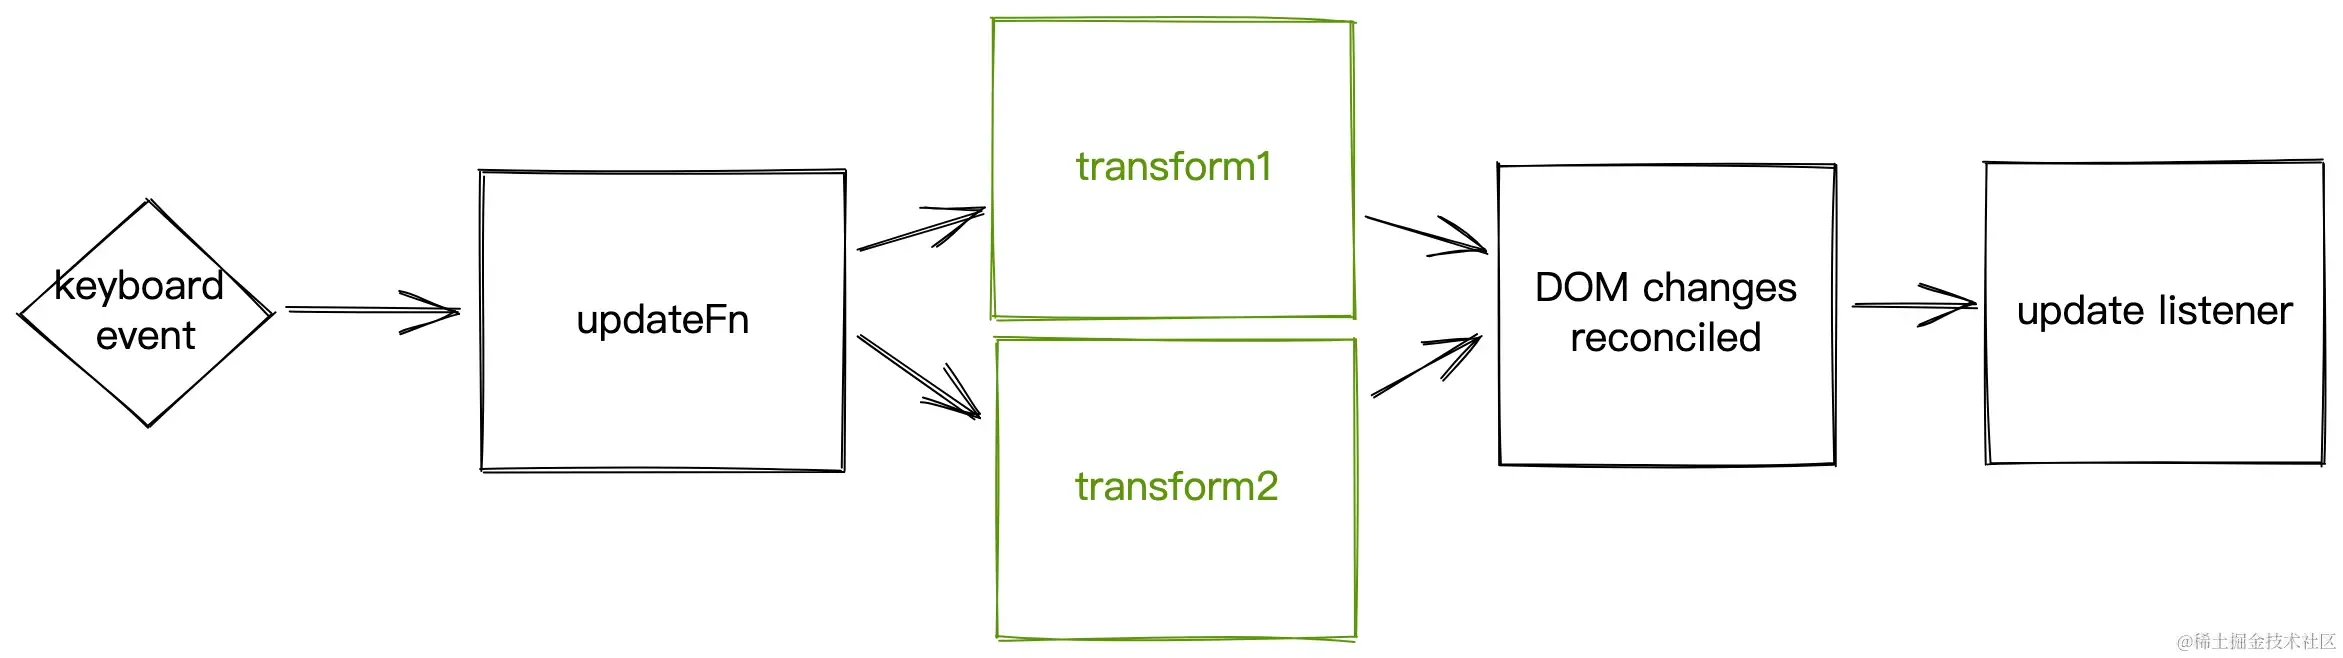
之所以比较高效,是因为多个转换只会导致一次DOM reconcile
一般情况下,转换只需要执行一次,但由于脏检查机制,可能会产生连带影响。我们有必要关注判断条件,以免转换陷入死循环:
1
2editor.registerNodeTransform(TextNode, textNode => {
3
4 if (!textNode.hasFormat('bold')) {
5 textNode.toggleFormat('bold');
6 }
7}
通常情况下次序并不重要,下面这个代码会在两次转换后结束:
1
2editor.registerNodeTransform(TextNode, textNode => {
3
4 if (textNode.getTextContent() === 'modified') {
5 textNode.setTextContent('re-modified');
6 }
7})
8
9editor.registerNodeTransform(TextNode, textNode => {
10
11 if (textNode.getTextContent() === 'original') {
12 textNode.setTextContent('modified');
13 }
14})
15
16editor.addListener('update', ({ editorState }) => {
17 const text = editorState.read($textContent);
18
19});
这里有三个示例可供参考:
指令(Commands)
在lexical中指令是一个很常用的功能,它提供了一套事件机制,在工具栏或复杂Plugin(如TablePlugin)中经常会用到
在LexicalCommands.ts可以查询到所有现存的指令,如果你想自定义一个指令,那么需要用到createCommand函数:
1const HELLO_WORLD_COMMAND: LexicalCommand<string> = createCommand();
2
3editor.dispatchCommand(HELLO_WORLD_COMMAND, 'Hello World!');
4
5editor.registerCommand(
6 HELLO_WORLD_COMMAND,
7 (payload: string) => {
8 console.log(payload);
9 return false;
10 },
11 LowPriority,
12);
指令可以在任何地方被dispatch(几乎全部的内部核心指令都是在LexicalEvents.ts里)
如果不再需要指令监听,那么一定记得及时清理:
1const removeListener = editor.registerCommand(
2 COMMAND,
3 (payload) => boolean,
4 priority,
5);
6
7removeListener();
插件(Plugin)
不同于大多数框架,lexical不给插件定义任何特定的协议,所谓的插件其实就是一个接收Editor实例的函数,这个函数返回一个清理函数。插件内的全部工作都是通过Editor实例调用指令(Commands)、转换(Transforms)、节点等接口实现的
lexical提供Vanilla JS版接口,不依赖任何框架,下面是一段示例代码(为了编写方便,我们用到了react。lexical提供了专门的react组件,使用更简单,但这里我们用的是Vanilla JS版接口):
1.editor-wrapper {
2 border: 2px solid gray;
3}
4#lexical-state {
5 width: 100%;
6 height: 300px;
7}
8.custom_quote_class_name {
9 margin: 0;
10 margin-left: 20px;
11 margin-bottom: 10px;
12 font-size: 15px;
13 color: rgb(101, 103, 107);
14 border-left-color: rgb(206, 208, 212);
15 border-left-width: 4px;
16 border-left-style: solid;
17 padding-left: 16px;
18}
1import React, { useEffect, useRef } from 'react';
2import reactDom from 'react-dom/client';
3import { registerDragonSupport } from '@lexical/dragon';
4import { createEmptyHistoryState, registerHistory } from '@lexical/history';
5import {
6 HeadingNode, QuoteNode, registerRichText, $createHeadingNode, $createQuoteNode
7} from '@lexical/rich-text';
8import { mergeRegister } from '@lexical/utils';
9import {
10 createEditor, $createParagraphNode, $createTextNode, $getRoot
11} from 'lexical';
12import './styles.css';
13
14function App() {
15 const editorRef = useRef();
16 const stateRef = useRef();
17 useEffect(() => {
18 const initialConfig = {
19 namespace: 'Vanilla JS Demo',
20
21 nodes: [HeadingNode, QuoteNode],
22 onError: error => {
23 throw error;
24 },
25 theme: {
26
27 quote: 'custom_quote_class_name'
28 }
29 };
30 const editor = createEditor(initialConfig);
31 editor.setRootElement(editorRef.current);
32
33
34 mergeRegister(
35 registerRichText(editor),
36 registerDragonSupport(editor),
37 registerHistory(editor, createEmptyHistoryState(), 300),
38 );
39
40 editor.update(() => {
41 const root = $getRoot();
42 if (root.getFirstChild() !== null) {
43 return;
44 }
45
46 const heading = $createHeadingNode('h1');
47 heading.append($createTextNode('这是一段标题'));
48 root.append(heading);
49 const quote = $createQuoteNode();
50 quote.append(
51 $createTextNode('这是一段引用'),
52 );
53 root.append(quote);
54 const paragraph = $createParagraphNode();
55 paragraph.append(
56 $createTextNode('一个段落'),
57 $createTextNode('lexical').toggleFormat('code'),
58 $createTextNode('.'),
59 $createTextNode(' 这里是 '),
60 $createTextNode('加粗文案').toggleFormat('bold'),
61 $createTextNode(' 这里是 '),
62 $createTextNode('斜体').toggleFormat('italic'),
63 $createTextNode(' 格式.'),
64 );
65 root.append(paragraph);
66 }, { tag: 'history-merge' });
67
68 editor.registerUpdateListener(({ editorState }) => {
69
70 stateRef.current.value = JSON.stringify(editorState.toJSON(), undefined, 2);
71 });
72 }, []);
73 return (
74 <div>
75 <div id='app'>
76 <div>
77 <h1>Lexical Basic - Vanilla JS</h1>
78 <div className='editor-wrapper'>
79 <div id='lexical-editor' contentEditable ref={editorRef} />
80 </div>
81 <h4>Editor state:</h4>
82 <textarea id='lexical-state' ref={stateRef} />
83 </div>
84 </div>
85 </div>
86 );
87}
88
89const root = reactDom.createRoot(document.getElementById('main'));
90root.render(<App />);
接下来将会详细介绍通过lexical实现一个实际的富文本编辑器,详见《快速打造你自己的富文本编辑器》