大家好,这篇文章主要是介绍基于nextjs14 搭建项目基础的最佳实现,并持续更新中,其中路由采用的是官方推荐的 APP router 模式,那咱们话不多说直接上干货。
项目地址:zhaoth/React-Next-Admin (github.com)
线上地址:react-next-admin.pages.dev
环境
Next.js 14版本对于Node.js最低的版本要求是 18.17.0 。同时也建议大家 node 版本的选择最好选择双数版本,众所周知 nodejs 的单数版本维护周期较短。同时如果同时有很多项目需要维护建议大家用 nvm 或者 volta 来管理 node 环境,这里就不详细介绍了。
创建
建议使用 create-next-app 启动新的 Next.js 应用程序,它会自动为您设置所有内容。若要创建项目,请运行:
1npx create-next-app@latest
安装时,你将看到以下提示:
1What is your project named? my-app
2Would you like to use TypeScript? No / Yes
3Would you like to use ESLint? No / Yes
4Would you like to use Tailwind CSS? No / Yes
5Would you like to use `src/` directory? No / Yes
6Would you like to use App Router? (recommended) No / Yes
7Would you like to customize the default import alias (@/*)? No / Yes
8What import alias would you like configured? @/*
- 项目的名称
- 是否使用 TypeScript
- 是否启用 Eslint
- 是否使用 src 作为目录
- 是否使用 APP 路由模式
- 是否使用 @ 设置别名
运行
1{
2 "scripts": {
3 "dev": "next dev",
4 "build": "next build",
5 "start": "next start",
6 "lint": "next lint"
7 }
8}
开发环境运行
1npm run dev
项目打包
1npm run build
开发端口号修改
dev默认的运行端口号是 3000 ,但是开发过程中如果需要修改,可以直接加上 -p 修改运行端口号
1"dev": "next dev -p 3000 --turbo",
—turbo 是在开发环境中启动对Turbopack的支持,目前暂时不支持在bulid中开启
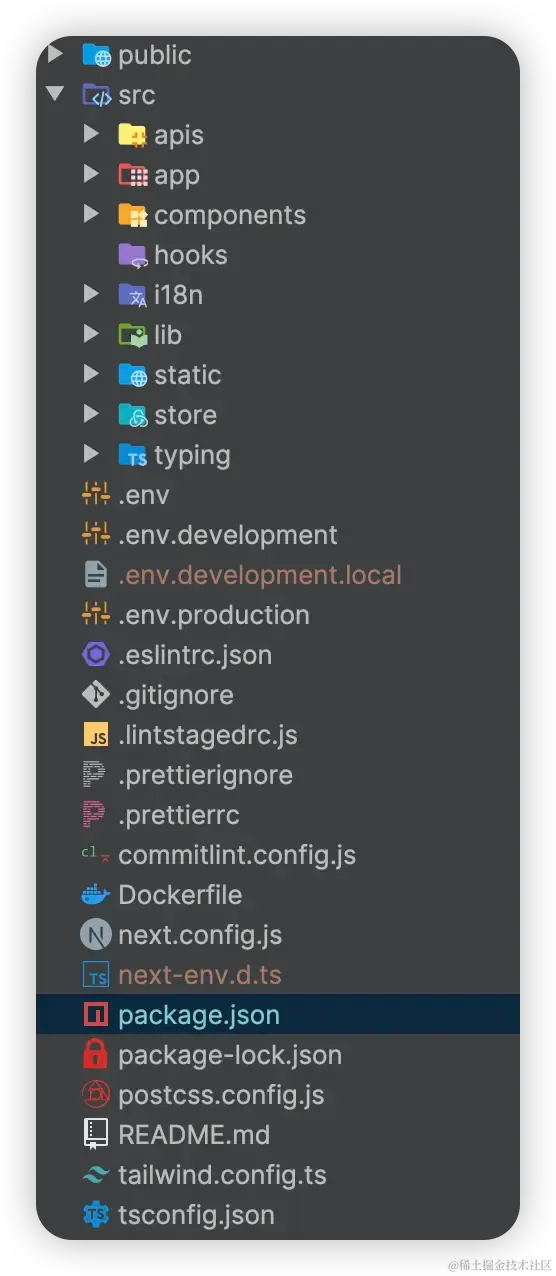
- public目录 静态资源目录
- src 源文件夹
- apis 请求接口
- app 页面组件
- components 共用组件库
- hooks 全局 hooks
- i18n 国际化
- lib 共用库
- static 静态变量管理
- store 状态管理
- typing 全局TypeScript管理
- env 基础环境变量
- env.development 开发环境变量
- env.development.local 本地开发环境变量
- env.production 发布版本环境变量
- .eslinttrc.json eslint配置信息
- .gitignore git忽略文件
- .lintstagedrc lint-staged配置
- .prettierignore 代码格式化忽略文件
- .prettierrc 代码格式设置
- commitlint.config commit 提交设置
- Dockerfile docker 构建配置
- next.config nextjs 配置
- tailwind.config tailwindcss 全局设置
Husky githooks工具可以预设git不同阶段的钩子函数
安装Husky
1npx husky install
安装commitlint
commitlint约定提交时的message的标准
1yarn add -D @commitlint/config-conventional @commitlint/cli
安装lint-staged
lint-staged避免每次提交全局lint,设置需要lint的文件
1npm install --save-dev lint-staged
执行husky 命令
1husky install
执行完这个命令后,工程目录中会生成.husky 目录,存储 hooks
设置.lintstagedrc.js
1const path = require('path');
2
3
4
5
6const buildEslintCommand = (filenames) =>
7 `next lint --fix --file ${filenames
8 .map((f) => path.relative(process.cwd(), f))
9 .join(' --file ')}`;
10
11module.exports = {
12 '*.{js,jsx,ts,tsx}': [buildEslintCommand],
13};
添加 hooks 命令
1npx husky add .husky/pre-commit "npm exec lint-staged" // 提交前的格式化
2npx husky add .husky/commit-msg 'npx --no -- commitlint --edit "$1"' // 提交信息格式校验
配置完成后 git commit 的时候就会对相关文件执行 lint 和 message 校验的工作了】
安装 axios 和 @siyuan0215/easier-axios-dsl
wangsiyuan0215/easier-axios-dsl: A DSL for axios, which makes it easier to use axios. (github.com)是一个通过 dsl 方式简化请求配置的插件
1 npm install @siyuan0215/easier-axios-dsl axios
添加 request.ts工具类
统一配置请求的 request 和 response 信息
1import { StatusCodes } from 'http-status-codes';
2import { G, requestCreator } from '@siyuan0215/easier-axios-dsl';
3
4const TIMEOUT = {
5 DEFAULT: 3 * 60000,
6 UPLOADING: 5 * 60000,
7};
8export const request = requestCreator({
9 baseURL: process.env.NEXT_PUBLIC_BASE_URL,
10 timeout: TIMEOUT.DEFAULT,
11 withCredentials: true,
12 requestInterceptors: [
13 (config) => {
14 return {
15 ...config,
16 timeout: TIMEOUT.UPLOADING,
17 headers: {
18 ...config.headers,
19 authorization: '1',
20 },
21 };
22 },
23 (error: any) => Promise.reject(error),
24 ],
25 responseInterceptors: [
26 (response) => {
27 const { data, status } = response;
28
29 if (status === StatusCodes.OK) {
30 return response;
31 }
32 return Promise.reject(response);
33 },
34 (error: string) => {
35 return Promise.reject(error);
36 },
37 ],
38});
39
40export const generatorAPIS = <T extends {}>(apiConfig: T) => G<T>(request, apiConfig);
注意process.env.NEXT_PUBLIC_BASE_URL是需要在 env 文件中初始化的,next.js中如果想要在静态部署的环境下能读取到就是必须在每个变量前面加 NEXT_PUBLIC_ 进行声明
在 apis 文件夹中添加接口信息
1
2import { generatorAPIS } from '@/lib/request';
3
4
5 * '[POST|GET|PUT|DELETE|...] [url] [d(data)(.(f|formData)):|q(query):|path:][keys with `,`]'
6 *
7 * d|data => data for POST and PUT
8 * - if data in request is array, you can use `[(d|data)]`;
9 * - if you want to pass all params to backend, you can use `(d|data):*`;
10 * - if you want to pass FormData to backend, you can use `(d|data).(f|formData):`;
11 *
12 * q|query => query for GET and DELETE;
13 *
14 * path => dynamic parameters in url, like: vehicle/tips/vehicleBaseInfo/{vin};
15 *
16 * eg.:
17 *
18 * import APIS from '@/api/XXX';
19 *
20 * APIS.testRequestUrlMethod(majorParams: Record<string, any>, otherParams?: Record<string, any>)
21 *
22 * If `majorParams` is array, and at the same time, you have to pass other params, you should use second param `otherParams`.
23 *
24 * POST:
25 * - `POST tipscase/save d:*`;
26 * equal: (params: unknown) => api.post<RoleListItem>({ url: baseUrl + 'tipscase/save', params }, true)
27 *
28 * - `POST static-files d:sourceType,systemType,fileName,file,remark`;
29 * equal: (types: string[]) => api.post<Record<string, DictionaryItem[]>>({ url: baseUrl + 'static-files', params: types })
30 *
31 * - `POST tipscase/save q:a,b,c`; => POST case-dict/search-types?a=[value of otherParams[a]]
32 * equal: (params: unknown) => api.post({ url: baseUrl + 'tipscase/save', params })
33 *
34 * - `POST case-dict/search-types [d] q:a` => POST case-dict/search-types?a=[value of otherParams[a]] and taking majorParams as data
35 * equal: (types: string[]) => api.post<Record<string, DictionaryItem[]>>({ url: baseUrl + 'case-dict/search-types' + '?=languageType=CN', params: types })
36 *
37 * ! What final `data` is depends on the keys of `d:[keys]`
38 *
39 * GET:
40 * - `GET tipscase/getInitInfo q:symptomId` => GET tipscase/getInitInfo?symptomId=[value of majorParams[symptomId]]
41 * equal: (symptomId: string) => api.get({ url: baseUrl + 'tipscase/getInitInfo' + symptomId })
42 *
43 * - `GET tipscase/get/{id} path:id` => GET tipscase/get/[value of majorParams[id]]
44 * equal: (id: string) => api.get({ url: baseUrl + 'tipscase/get/' + id })
45 * */
46
47enum apis {
48 getTableList = 'GET api query:results,page,size',
49}
50
51export default generatorAPIS<typeof apis>(apis);
设置开发代理
在next.config.js 中添加
1const isProd = ['production'].includes(process.env.NODE_ENV);
2
3const rewrites = () => {
4 if (!isProd) {
5 return [
6 {
7 source: '/api/:slug*',
8 destination: process.env.PROXY,
9 },
10 ];
11 } else {
12 return [];
13 }
14};
本项目状态管理没有选择传统的 redux 而是选择了比较轻巧的 zsutand该状态管理对于一般的项目已经足够用了
安装zustand
1npm instlal zustand
在 store 文件夹添加 store 并已 use 开头
1import { create } from 'zustand';
2import { createJSONStorage, persist } from 'zustand/middleware';
3import { defaultLocale, locales } from '@/static/locales';
4
5
6
7
8interface SettingState {
9 defaultLocale: string;
10 locales: string[];
11 setDefaultLocale: (newVal: string) => void;
12}
13
14const useSettingStore = create<SettingState>()(
15 persist(
16 (set, get) => ({
17 defaultLocale: get()?.defaultLocale ? get()?.defaultLocale : defaultLocale,
18 locales: locales,
19 setDefaultLocale: (newVal) => set((state: any) => ({
20 defaultLocale: state.defaultLocale = newVal,
21 })),
22 }),
23 {
24 name: 'setting',
25 storage: createJSONStorage(() => sessionStorage),
26 },
27 ),
28);
29
30export default useSettingStore;
persist是 zustand 的插件可以对 store 数据进行缓存
使用
1const defaultLocale = useSettigStore((state) => state.defaultLocale);
安装antdesign
1npm install antd --save
安装 @ant-design/nextjs-registry
1npm install @ant-design/nextjs-registry --save
如果你在 Next.js 当中使用了 App Router, 并使用 antd 作为页面组件库,为了让 antd 组件库在你的 Next.js 应用中能够更好的工作,提供更好的用户体验,你可以尝试使用下面的方式将 antd 首屏样式按需抽离并植入到 HTML 中,以避免页面闪动的情况
封装antd-registry
由于 antd 还有全局 config 的设置,为了以后方便还需要把AntdRegistry和ConfigProvide进行一次封装
1'use client';
2import React, { useEffect, useState } from 'react';
3import { App, ConfigProvider, ConfigProviderProps } from 'antd';
4import 'antd/dist/reset.css';
5import { AntdRegistry } from '@ant-design/nextjs-registry';
6import enUS from 'antd/locale/en_US';
7import zhCN from 'antd/locale/zh_CN';
8import dayjs from 'dayjs';
9import useSettingStore from '@/store/useSettingStore';
10import { locales } from '@/static/locales';
11type Locale = ConfigProviderProps['locale'];
12const AntdConfigProvider: React.FC<React.PropsWithChildren> = ({ children }) => {
13 const defaultLocale = useSettingStore((state) => state.defaultLocale);
14 const [locale, setLocal] = useState<Locale>(enUS);
15 useEffect(() => {
16 dayjs.locale('en');
17 if(defaultLocale === locales[0]){
18 setLocal(enUS)
19 dayjs.locale('en');
20 }else{
21 setLocal(zhCN)
22 dayjs.locale('zh-cn');
23 }
24 }, []);
25 return (
26 <ConfigProvider
27 componentSize="large"
28 locale={locale}
29 >
30 <div style={{ height: '100vh' }}>{children}</div>
31 </ConfigProvider>
32 );
33};
34
35const AntdStyleRegistry: React.FC<React.PropsWithChildren> = ({ children }) => {
36 return (
37 <AntdRegistry>
38 <AntdConfigProvider>
39 <App className="max-h-full min-h-full bg-white">{children}</App>
40 </AntdConfigProvider>
41 </AntdRegistry>
42 );
43};
44
45export default AntdStyleRegistry;
在 layout.tsx 中使用
1export default function EmptyLayout({ children, params: { locale } }: Props) {
2 const messages = locale === 'en' ? en : zh;
3 return (
4 <AntdStyledComponentsRegistry>
5 {children}
6 </AntdStyledComponentsRegistry>
7 );
8}
组件引用
Next.js App Router 当前不支持直接使用 . 引入的子组件,如 <Select.Option />、<Typography.Text /> 等,需要从路径引入这些子组件来避免错误。
本项目国际化是基于 APP Router & Static export模式为基础进行国际化设置的
安装next-intl
1npm install next-intl
next-intl 国内目前文档无法正常访问
设置 next.config.js
添加 output: ‘export’配置,由于此配置,当运行 npm run build 时,Next.js 将在 out 文件夹中生成静态 HTML/CSS/JS 文件。
1
2const nextConfig = {
3 output: 'export',
4}
5
6module.exports = nextConfig
设置国际化文件结构
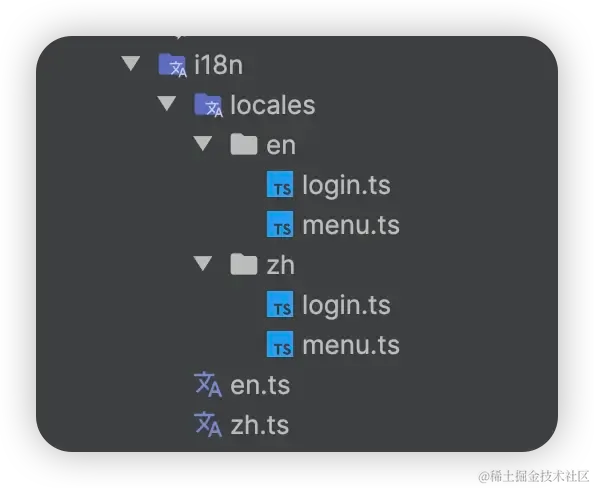
创建翻译文件
1export default {
2 welcome: 'Welcome',
3 dashboard: 'Dashboard',
4 list: 'List',
5 ahookList: 'ahookList',
6 proList: 'proList',
7};
引入新添加的翻译文件
1import login from './locales/en/login';
2import menu from '@/i18n/locales/en/menu';
3
4export default {
5 login,
6 menu,
7};
更新文件结构
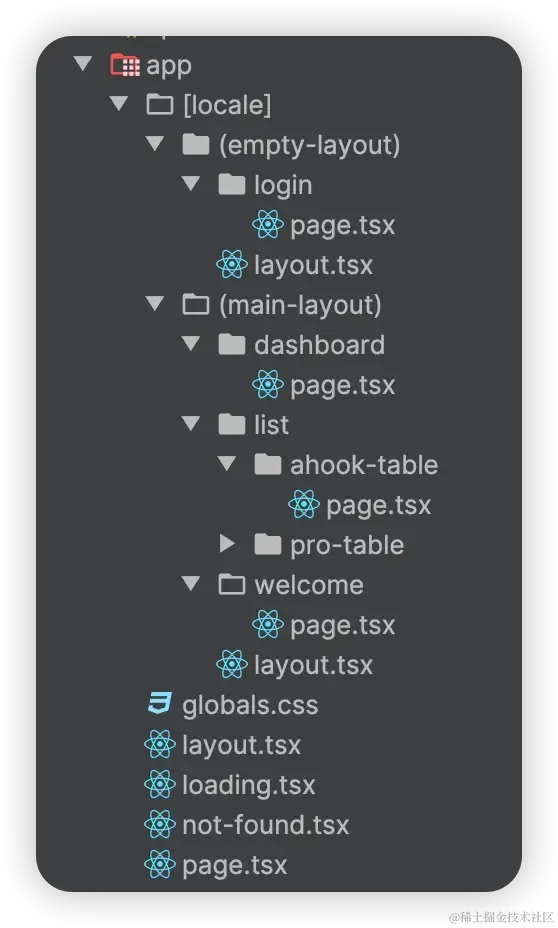 首先,创建 [locale] 文件夹并移动其中的现有 page.tsx 文件、layout.tsx 文件和 about 文件夹。不要忘记更新导入。 然后在跟目录的 page.tsx中将用户重定向到默认语言,如下:
1'use client';
2import { redirect } from 'next/navigation';
3import useSettingStore from '@/store/useSettingStore';
4import { staticRouter } from '@/static/staticRouter';
5
6export default function Home() {
7 const defaultLocale = useSettingStore((state) => state.defaultLocale);
8
9 redirect(`/${defaultLocale}/${staticRouter.login}`);
10}
注意:使用静态导出时,不能在没有前缀的情况下使用默认区域设置。我们必须将传入的请求重定向到默认语言。如文档中所述。
更新 app/[locale]/layout.tsx
1import { EmptyLayout } from '@/components';
2import React from 'react';
3import { Props } from '@/typing/Layout';
4import { locales } from '@/static/locales';
5
6
7export function generateStaticParams() {
8 return locales.map((locale) => ({ locale }));
9}
10
11export default function Layout({ children, params: { locale } }: Props) {
12 return (
13 <>
14 <EmptyLayout params={{
15 locale: locale,
16 }}>{children}</EmptyLayout>
17 </>
18 );
19}
EmptyLayout.tsx
1import '@/app/globals.css';
2import AntdStyledComponentsRegistry from '@/lib/antd-registry';
3import React from 'react';
4import { NextIntlClientProvider } from 'next-intl';
5import { Props } from '@/typing/Layout';
6import en from '@/i18n/en';
7import zh from '@/i18n/zh';
8import { timeZone } from '@/static/locales';
9
10export const metadata: { title: string, description: string } = {
11 title: 'React Next Admin',
12 description: '',
13};
14
15export default function EmptyLayout({ children, params: { locale } }: Props) {
16 const messages = locale === 'en' ? en : zh;
17 return (
18 <NextIntlClientProvider locale={locale} messages={messages} timeZone={timeZone}>
19 <AntdStyledComponentsRegistry>
20 {children}
21 </AntdStyledComponentsRegistry>
22 </NextIntlClientProvider>
23 );
24}
在这里我们除了往布局里面传递了 children 之后还传递了一个params参数,并添加 generateStaticParams 函数以生成所有区域设置的静态路由,同时我们在 emptylayout添加上下文提供程序 NextIntlClientProvider
更新页面和组件以使用翻译
1
2'use client'
3import { useTranslations } from 'next-intl'
4
5export default function HomePage() {
6 const t = useTranslations('HomePage')
7
8 return (
9 <div>
10 {t('helloWorld')}
11 </div>
12 )
13}
添加“use client”(截至目前,仅在客户端组件中支持使用 next-intl 的翻译)导入 useTranslations 钩子并在我们的 jsx 中使用它
创建语言切换组件
1import React, { useState } from 'react';
2import { Group } from 'antd/es/radio';
3import { usePathname as useIntlPathname, useRouter as useIntlRouter } from '@/lib/language';
4import useSettingStore from '@/store/useSettingStore';
5import { RadioChangeEvent } from 'antd';
6
7export default function ChangeLanguage() {
8 const options = [
9 { label: 'EN', value: 'en' },
10 { label: '中', value: 'zh' },
11 ];
12 const intlPathname = useIntlPathname();
13 const intlRouter = useIntlRouter();
14 const setDefaultLocale = useSettingStore((state) => state.setDefaultLocale);
15 const defaultLocale = useSettingStore((state) => state.defaultLocale);
16 const [value, setValue] = useState(defaultLocale);
17
18 const onLanguageChange = ({ target: { value } }: RadioChangeEvent) => {
19 setValue(value);
20 setDefaultLocale(value);
21 intlRouter.replace(intlPathname, { locale: value });
22 };
23 return (
24 <>
25 <Group options={options} onChange={onLanguageChange} value={value} key={value}>
26 </Group>
27 </>
28 );
29}
封装基于国际化的Link, redirect, usePathname, useRouter
由于静态导出模式,用 nextjs 自带的路由跳转的时候都必须添加 locale 较为麻烦下面是基于next-intl的createLocalizedPathnamesNavigation封装的路由,用法和 nextjs 路由一致
1export const { Link, redirect, usePathname, useRouter } =
2 createLocalizedPathnamesNavigation({
3 locales,
4 pathnames,
5 localePrefix,
6 });
静态模式
要启用静态导出,请更改其中 next.config.js 的输出模式:
1
2* @type {import('next').NextConfig}
3 */
4 const nextConfig = {
5 output: 'export',
6}
7
8module.exports = nextConfig
运行 next build 后,Next.js 将生成一个 out 文件夹,其中包含应用程序的 HTML/CSS/JS
注意:APP路使用next/router是会出现 router 未挂载的问题,需要使用next/navigation这个钩子函数
NodeJS环境部署
注意 运行 npm run start 来构建你的应用时,next.config.js 中 output: ‘export’ 需要去掉
1npm run build
运行 npm run start 启动 Node.js 服务器
1npm run start
Docker部署
设置dockfile
1# Install dependencies only when needed
2FROM node:alpine AS deps
3# Check https://github.com/nodejs/docker-node/tree/b4117f9333da4138b03a546ec926ef50a31506c3#nodealpine to understand why libc6-compat might be needed.
4RUN apk add --no-cache libc6-compat
5WORKDIR /app
6COPY package.json package-lock.json ./
7RUN yarn install --frozen-lockfile --registry=https://registry.npm.taobao.org
8
9# Rebuild the source code only when needed
10FROM node:alpine AS builder
11WORKDIR /app
12COPY . .
13COPY --from=deps /app/node_modules ./node_modules
14RUN yarn build && yarn install --production --ignore-scripts --prefer-offline --registry=https://registry.npm.taobao.org
15
16# Production image, copy all the files and run next
17FROM node:alpine AS runner
18WORKDIR /app
19
20ENV NODE_ENV production
21
22RUN addgroup -g 1001 -S nodejs
23RUN adduser -S nextjs -u 1001
24
25# You only need to copy next.config.js if you are NOT using the default configuration
26# COPY --from=builder /app/next.config.js ./
27COPY --from=builder /app/public ./public
28COPY --from=builder --chown=nextjs:nodejs /app/.next ./.next
29COPY --from=builder /app/node_modules ./node_modules
30COPY --from=builder /app/package.json ./package.json
31
32USER nextjs
33
34EXPOSE 4000
35
36ENV PORT 4000
37
38# Next.js collects completely anonymous telemetry data about general usage.
39# Learn more here: https://nextjs.org/telemetry
40# Uncomment the following line in case you want to disable telemetry.
41# ENV NEXT_TELEMETRY_DISABLED 1
42
43CMD ["node_modules/.bin/next", "start"]
构建 docker 镜像
1 docker image build -t react-next-admin .
2 docker image ls
运行镜像
1docker container run -d -p 8080:4000 -it react-next-admin
在本文中,我们讨论了如何用最新版的 NEXT,js 搭建一个完整的前端工程,本工程一直在持续开发中,有兴趣的可以访问github.com/zhaoth/Reac…