当前版本
node: 20.11.0 @nestjs/cli: 10.3.2 prisma: 5.18.0
初始化项目
安装NestJS
1npm i -g @nestjs/cli
2nest new project-name
3cd project-name
这里需要选择 package manager,本文是用
npm作为包管理器的
安装Prisma
1npm i prisma --save-dev
2npx prisma init
执行完上面两条命令之后,会发现多了一个 prisma 的文件夹和 .env 文件
prisma: 指定数据库连接,以及数据库 `schema.env: 用来配置环境变量
在VSCODE安装一下prisma插件,这样prisma.schema就可以高亮和格式化了
接下来修改一下连接数据库的配置,本文连接的是 MySQL,其他数据库可以去官方文档进行查看。 Prisma连接关系型数据库
先修改 .env 的环境变量
1// 数据库类型://用户名:密码@ip:端口/数据库名
2DATABASE_URL="mysql://root:123456@localhost:3306/demo"
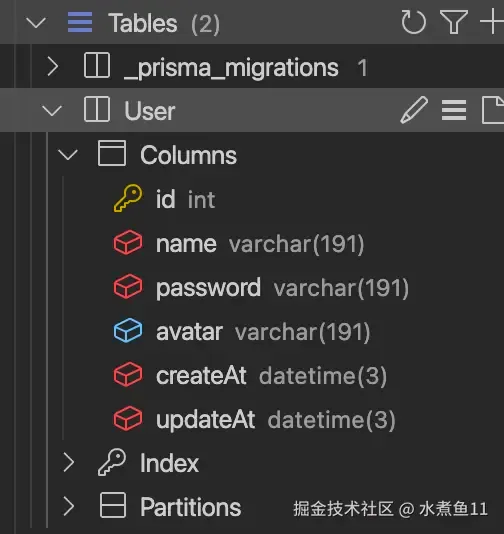
然后修改 prisma/prisma.schema,建立一个User表。
prisma.schema
1generator client {
2 provider = "prisma-client-js"
3}
4
5datasource db {
6 provider = "mysql"
7 url = env("DATABASE_URL")
8}
9
10model User {
11 id Int @id @default(autoincrement())
12 name String @unique
13 password String
14 avatar String?
15 createAt DateTime @default(now())
16 updateAt DateTime @updatedAt
17}
配置好 prisma.schema 之后,执行下面的命令来修改数据库。每次执行 prisma 都会生成一个变更记录,可以在 prisma/migrations 文件夹下面查看。
1npx prisma migrate dev --name init
执行完之后,再去查看数据库结构,User 表已经建立好了。到这里,开发环境就算搭建好了。
prisma.service.ts
把 prisma 注入到 NestJS,需要在 src 目录下面建一个新文件
1import { Injectable, OnModuleInit } from '@nestjs/common';
2import { PrismaClient } from '@prisma/client';
3
4@Injectable()
5export class PrismaService extends PrismaClient implements OnModuleInit {
6 async onModuleInit() {
7 await this.$connect();
8 }
9}
快速生成增删改查代码
NestJS 提供了快速生成增删改查的工具,可以通过 nest -h 来查看详细指令
1// g = generate res=resource
2nest g res user /module
执行完之后可以看到,在 src 下面多了 src/module/user 文件夹。
如果有修改过 src/app.module.ts 的文件结构, 先修改下 src/app.module.ts 文件,把 user 模块引入进来。
如果没有,NestJS 会自动帮你引入进来。
下面是实现增删改查的必要文件
user.module.ts
需要把 prismaService 放入 providers 中注入
1import { Module } from '@nestjs/common';
2import { UserService } from './user.service';
3import { UserController } from './user.controller';
4
5import { PrismaService } from '../../prisma.service';
6
7@Module({
8 controllers: [UserController],
9 providers: [UserService, PrismaService],
10})
11
12export class UserModule {}
dto/create-user.dto.ts
1export class CreateUserDto {
2 name: string;
3 password: string;
4 avatar?: string;
5 id?: number;
6}
user.controller.ts
1import {
2 Controller,
3 Get,
4 Post,
5 Body,
6 Patch,
7 Param,
8 Delete,
9} from '@nestjs/common';
10import { UserService } from './user.service';
11import { CreateUserDto } from './dto/create-user.dto';
12import { UpdateUserDto } from './dto/update-user.dto';
13import { Prisma } from '@prisma/client';
14
15@Controller('user')
16export class UserController {
17 constructor(private readonly userService: UserService) {}
18
19 @Post()
20 create(@Body() createUserDto: CreateUserDto) {
21 return this.userService.createUser(createUserDto);
22 }
23
24 @Get()
25 findAll(params: {
26 skip?: number;
27 take?: number;
28 cursor?: Prisma.UserWhereUniqueInput;
29 where?: Prisma.UserWhereInput;
30 orderBy?: Prisma.UserOrderByWithRelationInput;
31 }) {
32 return this.userService.users(params);
33 }
34
35 @Get(':id')
36 findOne(@Param('id') id: string) {
37 return this.userService.user({ id: +id });
38 }
39
40 @Patch(':id')
41 update(@Param('id') id: string, @Body() updateUserDto: UpdateUserDto) {
42 return this.userService.updateUser({
43 where: { id: +id },
44 data: updateUserDto,
45 });
46 }
47
48
49 @Delete(':id')
50 remove(@Param('id') id: string) {
51 return this.userService.deleteUser({ id: +id });
52 }
53}
user.service.ts
1import { Injectable } from '@nestjs/common';
2import { PrismaService } from '../../prisma.service';
3import { User, Prisma } from '@prisma/client';
4
5@Injectable()
6export class UserService {
7 constructor(private prisma: PrismaService) {}
8
9 async user(
10 userWhereUniqueInput: Prisma.UserWhereUniqueInput,
11 ): Promise<User | null> {
12 return this.prisma.user.findUnique({
13 where: userWhereUniqueInput,
14 });
15 }
16
17 async users(params: {
18 skip?: number;
19 take?: number;
20 cursor?: Prisma.UserWhereUniqueInput;
21 where?: Prisma.UserWhereInput;
22 orderBy?: Prisma.UserOrderByWithRelationInput;
23 }): Promise<User[]> {
24 const { skip, take, cursor, where, orderBy } = params;
25 return this.prisma.user.findMany({
26 skip,
27 take,
28 cursor,
29 where,
30 orderBy,
31 });
32 }
33
34
35 async createUser(data: Prisma.UserCreateInput): Promise<User> {
36 return this.prisma.user.create({
37 data,
38 });
39 }
40
41 async updateUser(params: {
42 where: Prisma.UserWhereUniqueInput;
43 data: Prisma.UserUpdateInput;
44 }): Promise<User> {
45 const { where, data } = params;
46 return this.prisma.user.update({
47 data,
48 where,
49 });
50 }
51
52 async deleteUser(where: Prisma.UserWhereUniqueInput): Promise<User> {
53 return this.prisma.user.delete({
54 where,
55 });
56 }
57}
最后执行 npm run start:dev 就可以启动了,默认端口3000。
1npm run start:dev
开启Swagger、开启CORS
安装 @nestjs/swagger
1npm i --save @nestjs/swagger
在 NestJS 中,只需要在 main.js 中配置几行就能启用。
1import { SwaggerModule, DocumentBuilder } from '@nestjs/swagger';
2
3
4
5
6const config = new DocumentBuilder()
7 .setTitle('NestjsAPI')
8 .setDescription('The Nestjs API description')
9 .setVersion('1.0')
10 .addBearerAuth()
11 .build();
12
13const document = SwaggerModule.createDocument(app, config);
14SwaggerModule.setup('swaggerApiDocs', app, document);
配置好 main.ts 之后,执行 npm run start:dev。等服务启动完访问 http://localhost:3000/swaggerApiDocs#/ 就可以看到 swagger 的页面了。
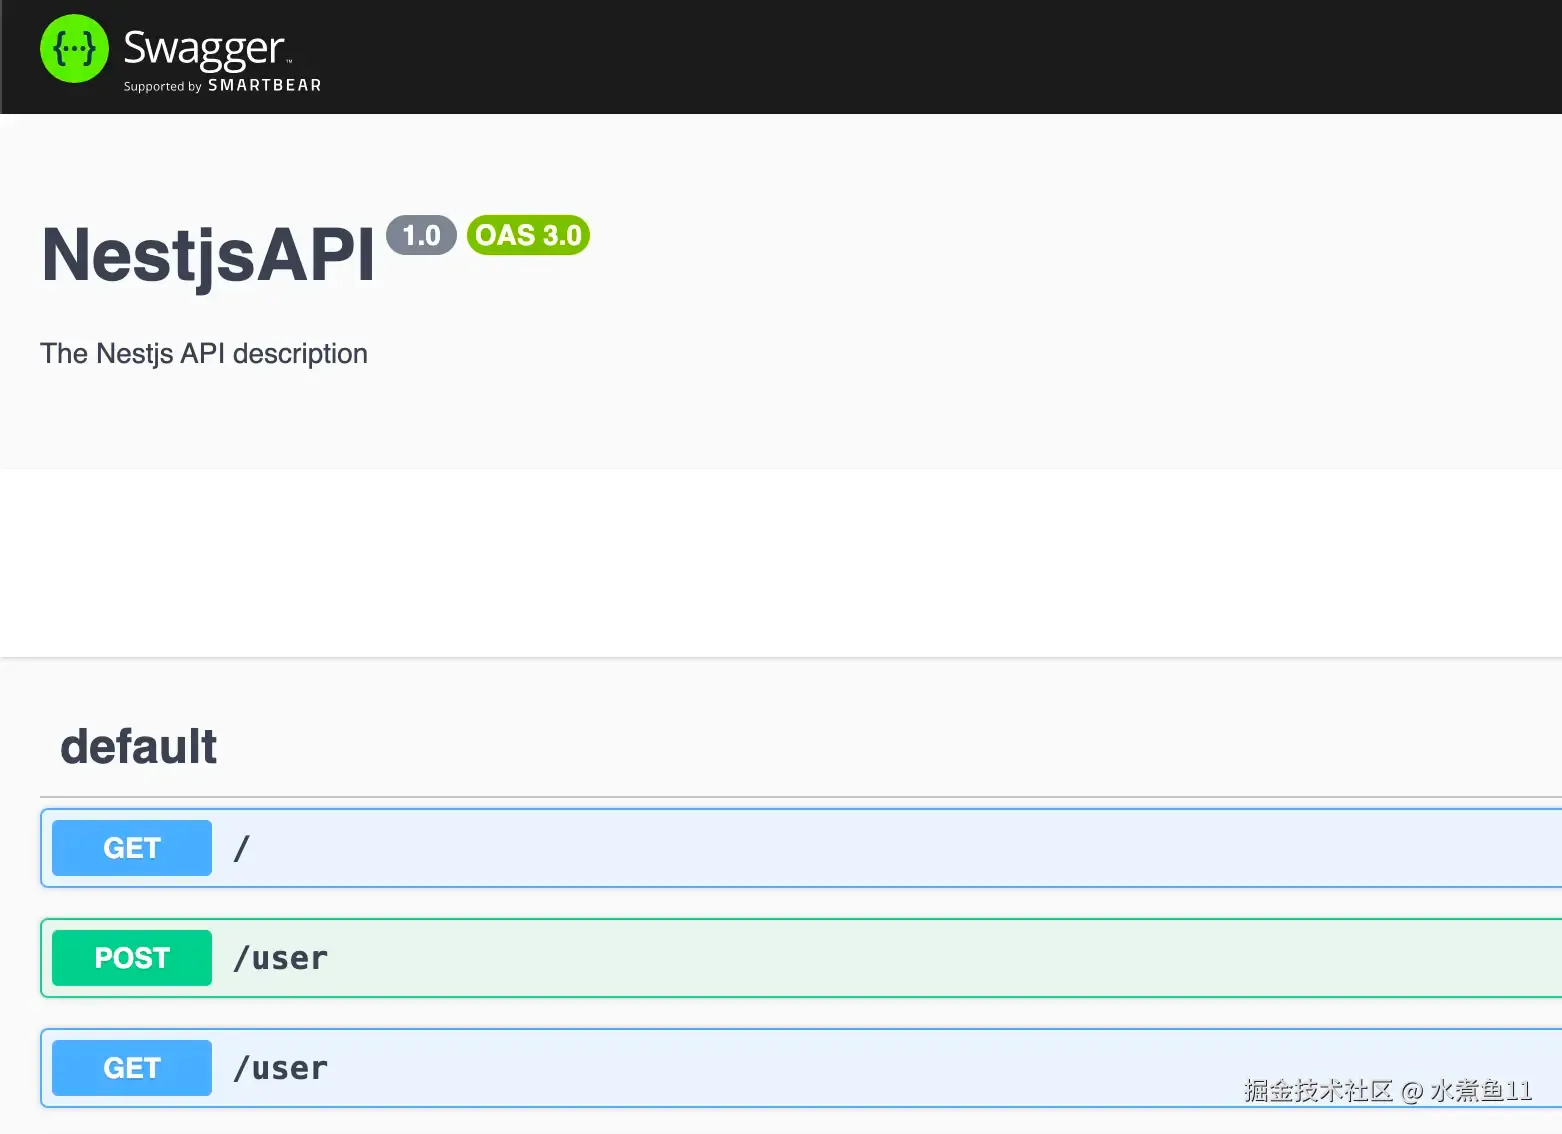
但是这里还是写着default,且没有任何注释说明。可以在 user.controller.ts 中通过 ApiTags 和 ApiOperation 给每个模块和接口定义备注。刷新一下 swagger 的页面就能看到备注已经生效了。
1import { ApiOperation, ApiTags } from '@nestjs/swagger';
2
3@ApiTags('User')
4@Controller('user')
5export class UserController {
6
7
8
9 @ApiOperation({ summary: 'Create user' })
10 @Post()
11 create(@Body() createUserDto: CreateUserDto) {
12 return this.userService.createUser(createUserDto);
13 }
14
15
16}
使用 swagger 来进行调试,会发现请求的参数是空,每次调用都需要手动输入参数。这时候可以配置 dto/create-user.dto.ts 来告诉 swagger,传参的格式是什么。配置完后,再刷新 swagger ,就能看到 Request body 里面的参数了。
1import { ApiProperty } from '@nestjs/swagger';
2
3export class CreateUserDto {
4 @ApiProperty({ required: true })
5 name: string;
6
7 @ApiProperty({ required: true })
8 password: string;
9
10 @ApiProperty()
11 avatar?: string;
12
13 @ApiProperty()
14 id?: number;
15}
如果进行前后端联调,需要开启 CORS,开启 CORS 的方式也很简单,只需要在 main.ts 增加下面的配置就行了。
1app.enableCors({
2 origin: true,
3 methods: 'GET,HEAD,PUT,PATCH,POST,DELETE',
4 allowedHeaders: 'Content-Type, Accept, Authorization',
5 credentials: true,
6});
环境变量、连接Redis
安装prisma的时候会生成 .env 文件,这里用 dotenv 的方式来实现环境变量的方法。\
1npm i --save @nestjs/config
然后可以定义属于你的环境变量文件,比如说 .env.production
新建一个 .env.production 文件来实验一下,加一个TEST_ENV 作为变量
1// .env.production
2// 修改成生产的数据库连接url
3DATABASE_URL="mysql://root:123456@localhost:3306/demo"
4
5TEST_ENV="production"
同时增加 .env.test 文件
1// .env.test
2DATABASE_URL="mysql://root:123456@localhost:3306/demo"
3
4TEST_ENV="test"
安装 dotenv-cli
1npm i --save-dev dotenv-cli
修改package.json, 让启动命令增加dotenv来制定要加载的命令
1{
2 "scripts": {
3 "build": "nest build",
4 "start:dev": "dotenv -e .env.test -- nest start --watch",
5 "start:prd": "dotenv -e .env.production -- node dist/main",
6 },
7}
需要在 app.module.ts 中,引入 ConfigModule 并将其配置成全局共享。这里同时展示一下,如何连接 Redis。连接 Redis 需要先安装 ioredis 包。
1npm i ioredis
1import { ConfigModule, ConfigService } from '@nestjs/config';
2import { RedisModule } from '@nestjs-modules/ioredis';
3
4@Module({
5 imports: [
6 ConfigModule.forRoot({
7
8 isGlobal: true,
9
10
11 }),
12
13 * 启用redis缓存模块
14 */
15 RedisModule.forRootAsync({
16 useFactory: (configService: ConfigService) => {
17 const redis = {
18 password: configService.get('REDIS_PASSWORD'),
19 host: configService.get('REDIS_HOST'),
20 port: configService.get('REDIS_PORT'),
21 db: configService.get('REDIS_DB'),
22 };
23
24 return {
25 type: 'single',
26 url: `redis://:${redis.password}@${redis.host}:${redis.port}/${redis.db}`,
27 };
28 },
29 inject: [ConfigService],
30 }),
31 ]
32})
33export class AppModule {}
如果是在 service 或者 controller 中使用, 可以在 constructor 里面引入,和其他service的使用方法一样。
这里测试一下前面配置的 .env.test 中的 TEST_ENV 究竟有没有生效,修改一下 app.service.ts。
1import { Injectable } from '@nestjs/common';
2import { ConfigService } from '@nestjs/config';
3
4@Injectable()
5export class AppService {
6 constructor(private configService: ConfigService) {}
7
8 getHello(): string {
9 return 'Hello World!' + this.configService.get('TEST_ENV');
10 }
11}
验证效果:
.env.test测试 ->npm run start:dev-> localhost:3000.env.procution测试 ->npm run build->npm run start:prd-> 浏览器输入 localhsot:3000
参数类型校验
可以使用 class-validator 插件来对传入参数进行类型校验。
1npm i --save class-validator class-transformer
在 main.ts 里面修改以下代码
1import {
2 ValidationPipe,
3 BadRequestException,
4 HttpStatus,
5} from '@nestjs/common';
6import { ValidationError } from 'class-validator';
7
8
9
10app.useGlobalPipes(
11 new ValidationPipe({
12
13 exceptionFactory: (errors: ValidationError[]) => {
14 const message = Object.values(errors[0].constraints!)[0];
15 return new BadRequestException({
16 message,
17 code: HttpStatus.BAD_REQUEST,
18 });
19 },
20 }),
21);
22
23
在 dto/create-user.dto.ts 里,根据需求放入相对应的注解。这里演示几个最简单的
1import { ApiProperty } from '@nestjs/swagger';
2import { IsEmail, IsNumber, IsOptional, IsString } from 'class-validator';
3
4export class CreateUserDto {
5 @ApiProperty({ required: true })
6 @IsEmail()
7 name: string;
8
9 @ApiProperty({ required: true })
10 @IsString()
11 password: string;
12
13 @ApiProperty()
14 @IsString()
15 @IsOptional()
16 avatar?: string;
17
18 @ApiProperty()
19 @IsNumber()
20 @IsOptional()
21 id?: number;
22}
这里用了 IsEmail 来举例,只要传进来的 name 不符合邮箱的规范,那么就会返回格式错误。
如果是 Get 请求,因为传入后端的都是字符串,需要在 class-validator 里面将数值进行二次转换。
1@Type(() => Number)
2id?: number;
格式化返回
先写一个返回类。
1import { ApiProperty } from '@nestjs/swagger';
2
3export const SUCCESS_CODE = 200;
4
5export class ResultData {
6 constructor(
7 code = SUCCESS_CODE,
8 message?: string,
9 data?: any,
10 ) {
11 this.code = code;
12 this.message = message;
13 this.data = data || null;
14 }
15
16 @ApiProperty({ type: 'number', default: SUCCESS_CODE })
17 code: number;
18
19 @ApiProperty({ type: 'string', default: 'ok' })
20 message?: string;
21
22 data?: any;
23
24 static ok(message?: string, data?: any): ResultData {
25 return new ResultData(SUCCESS_CODE, message, data);
26 }
27
28 static fail(code: number, message?: string, data?: any) {
29 return new ResultData(code, message, data);
30 }
31}
然后在每个 controller 的返回里面加上 ResultData.ok(...) 或者 ResultData.fail(...),类似下面这个案例
1@ApiOperation({ summary: 'Create user' })
2@Post()
3async create(@Body() createUserDto: CreateUserDto) {
4 const result = await this.userService.createUser(createUserDto);
5 return ResultData.ok('success', result);
6}
Exception filters 异常处理
Exception filters 是 NestJS 提供的错误捕获器。NestJS 在运行时会遇到很多种不同的错误,需要对不同类型的错误进行错误处理。
如果是 Prisma 产生的错误,它会直接返回,会导致默认格式不一样,导致前端处理不了。
还有 class-validaor 的错误处理,也需要对其进行错误的特殊处理
快速创建 filters 文件
1nest g filter global /common/filter
2
3
4nest g filter prisma /common/filter
prisma.filter.ts
1import {
2 ArgumentsHost,
3 Catch,
4 ExceptionFilter,
5 HttpStatus,
6} from '@nestjs/common';
7import { Prisma } from '@prisma/client';
8
9@Catch(Prisma.PrismaClientKnownRequestError)
10export class PrismaFilter implements ExceptionFilter {
11 catch(exception: Prisma.PrismaClientKnownRequestError, host: ArgumentsHost) {
12 const ctx = host.switchToHttp();
13 const response = ctx.getResponse();
14 response.status(HttpStatus.INTERNAL_SERVER_ERROR).json({
15 code: exception.code,
16 message: exception.message,
17 });
18 }
19}
global.filter.ts
1import {
2 ArgumentsHost,
3 BadRequestException,
4 Catch,
5 ExceptionFilter,
6 HttpException,
7 HttpStatus,
8} from '@nestjs/common';
9
10@Catch()
11export class GlobalFilter implements ExceptionFilter {
12 catch(exception: any, host: ArgumentsHost) {
13 const ctx = host.switchToHttp();
14 const response = ctx.getResponse();
15 const status =
16 exception instanceof HttpException
17 ? exception.getStatus()
18 : HttpStatus.INTERNAL_SERVER_ERROR;
19 if (exception instanceof BadRequestException) {
20 response.status(status).json(exception.getResponse());
21 } else {
22 response.status(status).json({
23 code: status,
24 message: `Service Error: ${exception}`,
25 });
26 }
27 }
28
29}
接下来配置 main.ts
1import { GlobalFilter } from './common/filter/global/global.filter';
2import { PrismaFilter } from './common/filter/prisma/prisma.filter';
3
4
5
6
7app.useGlobalFilters(new GlobalFilter());
8app.useGlobalFilters(new PrismaFilter());
9
10
全局守卫、jwt校验
全局守卫意味着每个请求到达 controller 之前,会经过全局守卫。全局守卫比较适合做权限校验,将不符合条件的用户请求全部拦截。
安装 @nest/jwt
1npm i --save @nestjs/jwt
在 module/user.module.ts 中注册 jwt 模块
1import { JwtModule } from '@nestjs/jwt';
2
3@Module({
4 imports: [
5 JwtModule.register({
6 global: true,
7 secret: 'SECRET',
8 signOptions: { expiresIn: '7d' },
9 }),
10 ],
11
12})
在 service 生成 token
1const access_token = await this.jwtService.signAsync(payload);
使用 nest 快速生成 guard 文件
1nest g gu auth /common/guard
auth.guard.ts
1import {
2 Injectable,
3 CanActivate,
4 HttpException,
5 HttpStatus,
6 ExecutionContext,
7} from '@nestjs/common';
8import { JwtService } from '@nestjs/jwt';
9
10@Injectable()
11export class AuthGuard implements CanActivate {
12
13 async canActivate(context: ExecutionContext): Promise<boolean> {
14
15
16 const request = context.switchToHttp().getRequest();
17
18
19 let token = context.switchToRpc().getData().headers.authorization;
20 token = this.extractTokenFromHeader(token);
21
22
23 if (token) {
24 try {
25
26 const jwtService = new JwtService();
27 const res = jwtService.verify(token, { secret: 'SECRET' });
28
29
30 request['user'] = res;
31
32 return res;
33 } catch (e) {
34 throw new HttpException(
35 '没有授权访问,请先登陆',
36 HttpStatus.UNAUTHORIZED,
37 );
38 }
39 } else {
40
41 if (this.hasUrl(this.urlList, request.url)) {
42 return true;
43 }
44 throw new HttpException(
45 '没有授权访问,请先登陆',
46 HttpStatus.UNAUTHORIZED,
47 );
48 }
49 }
50
51
52 private urlList: string[] = ['/', '/user'];
53
54
55 private hasUrl(urlList: string[], url: string): boolean {
56 let flag: boolean = false;
57 if (urlList.indexOf(url.split('?')[0]) >= 0) {
58 flag = true;
59 }
60 return flag;
61 }
62
63 private extractTokenFromHeader(authorization: string): string | undefined {
64 const [type, token] = authorization?.split(' ') ?? [];
65 return type === 'Bearer' ? token : undefined;
66 }
67}
在 main.ts 中注册全局守卫,注册完成后,访问非白名单的url,就会报没有登录的错误。
1import { AuthGuard } from './common/guard/auth/auth.guard';
2
3
4
5app.useGlobalGuards(new AuthGuard());
6
7
生产环境
如果生产环境走的是服务器上的CICD,在 npm install 之后需要执行以下 npx prisma generate 来生成必要的 typescript 文件。
在 package.json 的 script 中增加一个指令
1{
2 "prisma:generate": "dotenv -e .env.production -- npx prisma generate"
3}
这里贴上一个部署用的 Dockerfile
1# node镜像
2FROM node:20-alpine
3
4ENV NODE_VERSION 20.15.1
5# Set working dir inside base docker image
6WORKDIR /usr/src/app
7# Copy our project files to docker image
8COPY . .
9# npm 源,选用国内镜像源以提高下载速度
10RUN npm config set registry http://mirrors.cloud.tencent.com/npm/
11RUN npm install -g node-gyp
12# Install project dependencies
13RUN npm install
14# Generate Prisma client files
15RUN npm run prisma:generate
16RUN npm run build
17
18EXPOSE 3000
19
20CMD ["npm", "run","start:prd"]