前言
做了7年前端我一直不知道瀑布流是什么(怪设计师不争气啊,哈哈哈),我一直以为就是个普通列表,几行css解决的那种。
当然瀑布流确实有css解决方案,但是这个方案对于分页列表来说完全不能用,第二页内容一出来位置都变了。
我看了一下掘金的一些文章,好长啊,觉得还是自己想一下怎么写吧。就自己实现了一遍。希望思路给大家一点帮助。
分析瀑布流

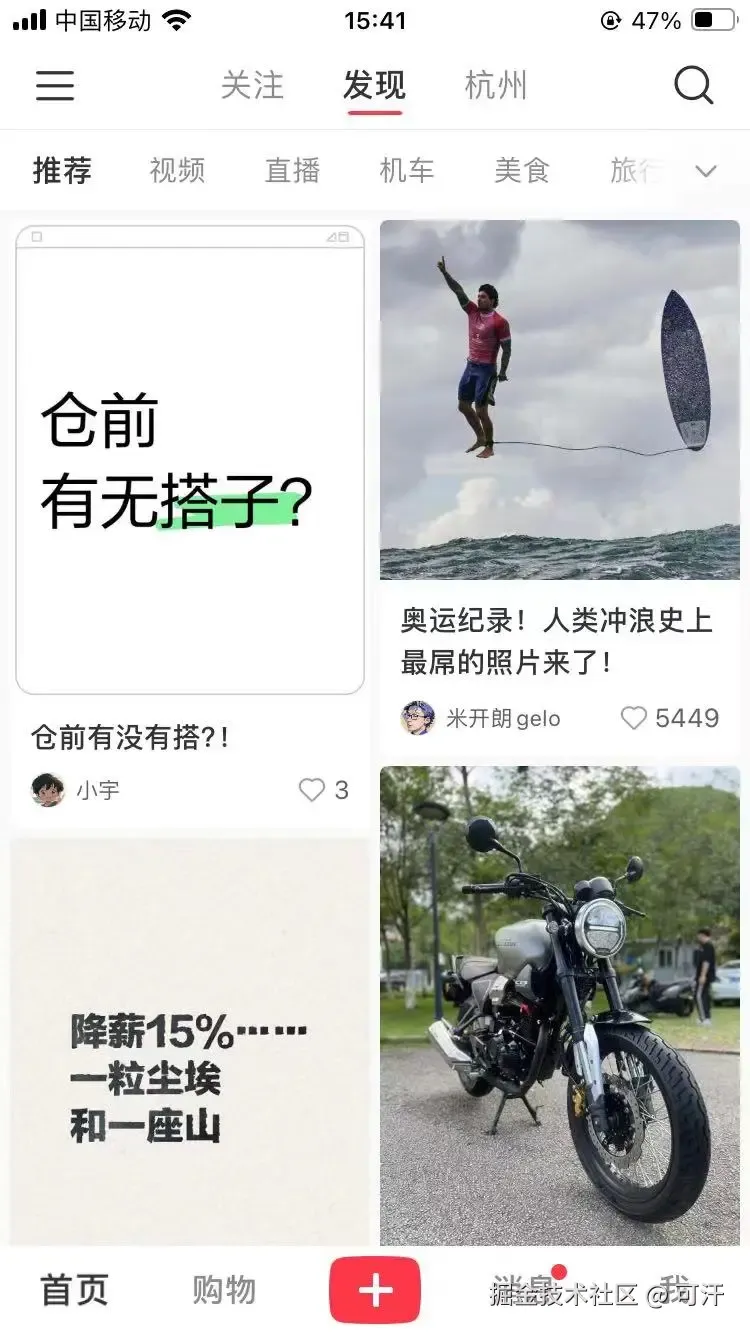
以小红书的瀑布流为例,相同宽度不同高度的卡片堆叠在一起形成瀑布流。
这里有两个难点:
-
卡片高度如何确定?
-
堆叠布局如何实现?
卡片的高度 = padding + imageHeight + textHeight…
不固定的内容包括:图片高度、标题行数
也就是说当我们解决了图片和标题的高度问题,那么瀑布流的第一个问题就解决了。(感觉已经写好代码了一样)
堆叠问题——因为css没有这样的布局方式,所以肯定得用js实现。最简单的解决方案就是对每一个盒子进行绝对定位。
这个问题就转换成计算现有盒子的定位问题。
从问题到代码
第一个问题——图片高度
无论是企业业务场景还是个人开发,通过后端返回图片的width、height都是合理且轻松的。
前端去获取图片信息,无疑让最重要的用户体验变得糟糕。前端获取图片信息并不困难,但是完全没有必要。
所以我直接考虑后端返回图片信息的情况。
1const realImageHeight = imageWidth / imageHeight * cardContentWidth;
图片高度轻松解决,无平台差异
第二个问题——文字高度
从小红书可以看出,标题有些两行有些一行,也有些三行。
如果你固定一行,这个问题完全可以跳过。
- 方案一:我们可以用字数和宽度来计算可能得行数
优势:速度快,多平台复用
劣势:不准确(标题包括英文中文) - 方案二:我们可以先渲染出来再获取行数
优势:准确
劣势:相对而言慢,不同平台方法不同
准确是最重要的!选择方案二
其实方案二也有两种方案,一种是用canvas模拟,这样可以最大限度摆脱平台(h5、小程序)的限制,
然而我试验后,canvas还没找到准确的计算的方法(待后续更新)
第二种就是用div渲染一遍,获取行数或者高度。
创建一个带有指定样式的 div 元素
1function createDiv(style: string): HTMLDivElement {
2 const div = document.createElement('div');
3 div.style.cssText = style;
4 document.body.appendChild(div);
5 return div;
6}
计算文本数组在指定字体大小和容器宽度下的行数
1
2* 计算文本数组在指定字体大小和容器宽度下的行数
3* @param texts - 要渲染的文本数组
4* @param fontSize - 字体大小(以像素为单位)
5* @param lineHeight - 字体高度(以像素为单位)
6* @param containerWidth - 容器宽度(以像素为单位)
7* @param maxLine - 最大行数(以像素为单位)
8* @returns 每个文本实际渲染时的行数数组
9*/
10export function calculateTextLines(
11 texts: string[],
12 fontSize: number,
13 lineHeight: number,
14 containerWidth: number,
15 maxLine?: number
16): number[] {
17
18 const div = createDiv(`font-size: ${fontSize}px; line-height: ${lineHeight}px; width: ${containerWidth}px; white-space: pre-wrap;`);
19 const results: number[] = [];
20 texts.forEach((text) => {
21 div.textContent = text;
22
23 const divHeight = div.offsetHeight;
24 const lines = Math.ceil(divHeight / lineHeight);
25 maxLine && lines > maxLine ? results.push(maxLine) : results.push(lines);
26 });
27
28
29 removeElement(div);
30
31 return results;
32}
这个问题小程序如何解决放在文末
第三个问题——每个卡片的定位问题
解决了上面的问题,就解决了盒子高度的问题,这个问题完全就是相同宽度不同高度盒子的堆放问题了
问题的完整描述是这样的:
写一个ts函数实现将一堆小盒子,按一定规则顺序推入大盒子里
函数输入:小盒子高度列表
小盒子:不同小盒子高度不一致,宽度为stackWidth,彼此间隔gap
大盒子:高度无限制,宽度为width
堆放规则:优先放置高度低的位置,高度相同时优先放在左侧
返回结果:不同盒子的高度和位置信息
如果你有了这么清晰的描述,接下去的工作你只需要交给gpt来写你的函数
1
2export interface Box {
3 x: number;
4 y: number;
5 height: number;
6}
7
8export class BoxPacker {
9
10 private boxes: Box[] = [];
11
12 private width: number;
13
14 private stackWidth: number;
15
16 private gap: number;
17
18 constructor(width: number, stackWidth: number, gap: number) {
19 this.width = width;
20 this.stackWidth = stackWidth;
21 this.gap = gap;
22 this.boxes = [];
23}
24
25public addBox(height: number): Box[] {
26 return this.addBoxes([height]);
27}
28
29public addBoxes(heights: number[], isReset?: boolean): Box[] {
30 isReset && (this.boxes = [])
31 console.log('this.boxes—————— ', JSON.stringify(this.boxes) )
32
33 for (const height of heights) {
34 const position = this.findBestPosition();
35 const newBox: Box = { x: position.x, y: position.y, height };
36 this.boxes.push(newBox);
37 }
38 return this.boxes;
39}
40
41private findBestPosition(): { x: number; y: number } {
42 let bestX = 0;
43 let bestY = Number.MAX_VALUE;
44
45 for (let x = 0; x <= this.width - this.stackWidth; x += this.stackWidth + this.gap) {
46 const currentY = this.getMaxHeightInColumn(x, this.stackWidth);
47 if (currentY < bestY || (currentY === bestY && x < bestX)) {
48 bestX = x;
49 bestY = currentY;
50 }
51 }
52
53 return { x: bestX, y: bestY };
54}
55
56private getMaxHeightInColumn(startX: number, width: number): number {
57 return this.boxes
58 .filter(box => box.x >= startX && box.x < startX + width)
59 .reduce((maxHeight, box) => Math.max(maxHeight, box.y + box.height + this.gap), 0);
60}
61}
62
这样我们就实现了根据高度获取定位的功能了
来实现一波
核心的代码就是获取每个盒子的定位、宽高信息
1
2const boxPacker = useMemo(() => {
3 return new BoxPacker(width, stackWidth, gap)
4}, []);
5
6const getCurrentPosition = (currentData: DataItem[], reset?: boolean) => {
7
8 const textLines = calculateTextLines(currentData.map(item => item.title),card.fontSize,card.lineHeight, cardContentWidth)
9
10 const imageHeight = currentData.map(item => (item.imageHeight / item.imageWidth * cardContentWidth))
11
12 const cardHeights = imageHeight.map((h, index) => (
13 h + textLines[index] * card.lineHeight + card.padding * 2 + (card?.otherHeight || 0)
14 )
15 );
16
17 const boxes = boxPacker.addBoxes(
18 cardHeights,
19 reset
20 )
21
22 return boxes.map((box, index) => ({
23 ...box,
24 title: currentData[index]?.title,
25 url: currentData[index]?.url,
26 imageHeight: imageHeight[index],
27 }))
28}
set获取到的盒子信息
1const [boxPositions, setBoxPositions] = useState<(Box & Pick<DataItem, 'url' | 'title' | 'imageHeight'>)[]>([]);
2useEffect(() => {
3
4 if (page === 1) {
5 setBoxPositions(getCurrentPosition(data, true))
6 } else {
7
8 setBoxPositions(getCurrentPosition(data.slice((page - 1) * pageSize, page * pageSize)))
9 }
10}, [])
效果如下

小程序获取文本高度
从上面的分析可以看出来只有文本高度实现是不同的,如果canvas方案实验成功,说不定还能做到大一统。
目前没成功大家就先看看我的目前方案:先实际渲染文字然后读取信息,然后获取实际高度
1import React, {useEffect, useMemo, useState} from 'react'
2import { View } from '@tarojs/components'
3import Taro from "@tarojs/taro";
4import './index.less'
5import {BoxPacker} from "./flow";
6
7const data = [
8 'vwyi这是一个标题,这是一个标题,这是一个标题,这是一个标题',
9 '这是一个标题',
10 '这是一个标题,这是一个标题,这是一个标题,这是一个标题',
11 '这是一个标题',
12 '这是一个标题,这是一个标题,这是一个标题,一个标题',
13 '这是一个标题,这是一个标题,这是一个标题,这题',
14 '这是一个标题,这是一个标题,这是一',
15 '这是一个标题,这是一个标题,这是一',
16];
17
18function Index() {
19const boxPacker = useMemo(() => new BoxPacker(320, 100, 5), []);
20
21const [boxPositions, setBoxPositions] = useState<any[]>([])
22function getTextHeights() {
23return new Promise((resolve, reject) => {
24 Taro.createSelectorQuery()
25 .selectAll('#textContainer .text-item')
26 .boundingClientRect()
27 .exec(res => {
28 if (res && res[0]) {
29 const heights = res[0].map(item => item.height);
30 resolve(heights);
31 } else {
32 reject('No buttons found');
33 }
34 });
35 });
36}
37useEffect(() => {
38 getTextHeights().then(h => {
39 setBoxPositions(boxPacker.addBoxes(h))
40 })
41}, [])
42return (
43<View className="flow-container">
44<View id="textContainer">
45{
46data.map((item, index) => (<View key={index} className="text-item">{item}</View>))
47}
48</View>
49<View className="text-box-container">
50{boxPositions.map((position, index) => (
51<View
52key={index}
53className="text-box"
54style={{
55left: `${position.x}px`,
56top: `${position.y}px`,
57height: `${position.height}px`,
58width: '100px', // 假设盒子的宽度固定为100px
59}}
60>
61{`${data[index]}`}
62</View>
63))}
64
65</View>
66
67</View>
68)
69}
70
71export default Index
72